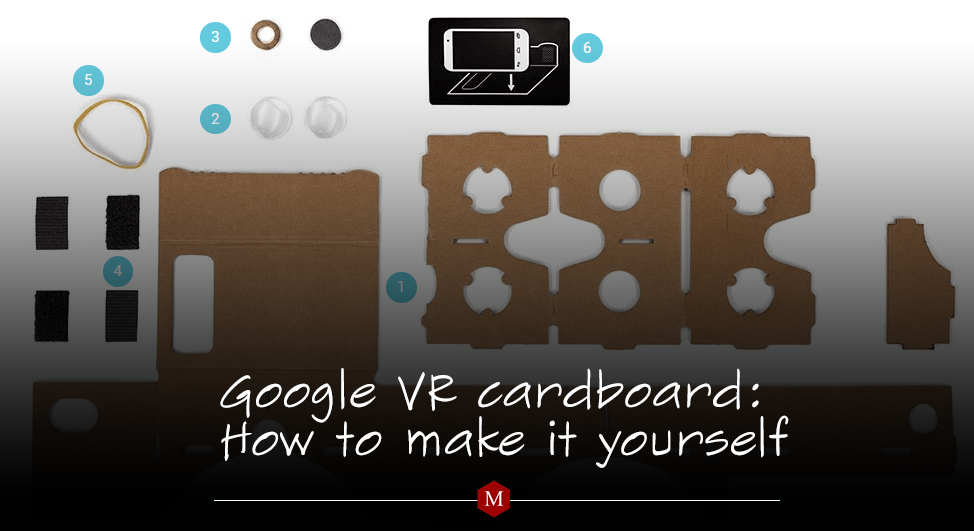
Virtual Reality is the next big thing in the gadgets industry. Samsung Gear VR, Facebook Oculus Rift and Google VR Cardboard are some of the most popular virtual reality or augmented reality headsets available for different prices in different markets. The latest news suggest that Apple is also working on the virtual reality stuff secretly and is planning to launch something sooner than expected.
If you are looking for the more premium virtual reality solutions, the Samsung Gear VR is the most popular solution in the market whereas you can also pre-order the Oculus Rift for $599 along with some cool accessories to feel the complete virtual reality (augmented reality) experience.
On the other hand, If you just want to sense the virtual reality world, no need to wait for the expensive Oculus Rift or not so expensive Samsung Gear VR as Google has the most cheapest and basic solution for you. The Google VR cardboard makes your Android phone or iPhone into a virtual reality headset for just $3. The Google Cardboard was first unveiled at Google I/O 2014 for small-screen phones running Android 4.1 or later but now it is extended to more devices including iPhone and supports almost all the sizes.
The new Cardboard was upgraded to cover more devices upon its release at Google I/O 2015. The new Cardboard works with all devices having display size not larger than 6inch. Also the Cardboard SDK is now available for iOS app developers to develop iPhone apps for Google VR Cardboard.
You can purchase both first and second generation Google VR Cardboard headset from stores in good varieties. The prices are quite low for the DIY kits which usually starts from $3 but some of them are supplied without head straps and NFC. However you may have to pay a little extra for the pre-assembled headsets.
How to make a Google VR Cardboard headset yourself
As discussed above, the Google VR Cardboard is a DIY project that enables you to set up your virtual reality headset yourself. Here we have bring the step by step guide to tell you about how to build a first-generation Google Cardboard headset. There are no basic changes in second-gen Cardboard, therefore you can also take the guide same for the Google Cardboard 2.
Pre-Requisites for Google VR Cardboard
- Android Phone with Android 4.1 or later or iPhone with 8.1 or later.
- 3 Pieces of cardboard
- Two Bi-Convex lenses of at-least 24mm
- Two small magnets
- Two small Velcro pads
Step 1: Take the cardboard and remove unwanted material carefully from the pre-cut areas. Now in the large circular holes on the cardboard, place the two lenses and fold the cardboard front and back to fix them on their place.
Step 2: Now fold the main piece of cardboard with the circle facing inward. You can later place the magnet on the circle.
Step 3: Fold the main cardboard pieces around the piece carrying the lenses. Make sure that center holes are facing the front with the small divider in its slot.
Step 4: Create the compartment for your phone using two Velcro pads that you found in the package. Place both pads on top of the headset to fasten the flap of the cardboard.
Step 5: Now download the Google Cardboard app from the play store. The App comes in 74.63MB size therefore make sure that you have enough storage on your phone and an active Wi-Fi connection.
Step 6: At the end, place your phone inside the Cardboard headset. On the main cardboard piece you will find the cutout from where your phone’s camera needs to be seen.
How to start your VR Experience
Now that your very own Google VR Cardboard is ready, you have installed the app on your phone and the phone is inside the cardboard, you should put it in front of your eyes like any other glasses. Once you have launched the app wearing the cardboard, once you move your eyes left or right, it will start scrolling the app accordingly. Now you can select the guides, tutorials, Youtube, Street View or anything you choose from the menu.

