RecyclerView is a new way to customize and show your data in the list format. Advantage of using Android RecyclerView over listview is that not only you can show data in list format but also as grids having cells of different size color and style. Recycler View is also more power full than list view.
In your gradle file add this line and press sync in your android studio IDE.
Dependencies

{

compile ‘com.android.support:recyclerview-v7:23.0.1’

}
In your main activity layout add following code.
<RelativeLayout xmlns:android="http://schemas.android.com/apk/res/android"

xmlns:tools="http://schemas.android.com/tools" android:layout_width="match_parent"

android:layout_height="match_parent" android:paddingLeft="@dimen/activity_horizontal_margin"

android:paddingRight="@dimen/activity_horizontal_margin"

android:paddingTop="@dimen/activity_vertical_margin"

android:paddingBottom="@dimen/activity_vertical_margin" tools:context=".RecycleViewActivity">

<TextView

android:layout_width="wrap_content"

android:layout_height="wrap_content"

android:textAppearance="?android:attr/textAppearanceLarge"

android:text="RecycleView Example"

android:textColor="#FFFF952F"

android:textSize="25sp"

android:id="@+id/textView"

android:layout_centerHorizontal="true"

android:layout_alignParentTop="true" />
<android.support.v7.widget.RecyclerView
android:id="@+id/reList"
android:layout_width="match_parent"
android:layout_height="match_parent"
android:scrollbars="vertical"
android:layout_below="@+id/textView"
android:layout_alignParentLeft="true"
android:layout_alignParentStart="true"
android:layout_alignParentBottom="true" />
</RelativeLayout>
Go to your main activity class and in onCreate function link your recycler view layout.
setContentView(R.layout.activity_recycle_view);

RecyclerView recycleList = (RecyclerView) findViewById(R.id.reList);
Create a class for PersonalInfo and create setter and getter for all fields of the class. This class will be our datamodel.
public class PersonalInfo {
String name;
String fname;
String email;
public String getEmail() {
return email;
}
public void setEmail(String email) {
this.email = email;
}
public String getFname() {
return fname;
}
public void setFname(String fname) {
this.fname = fname;
}
public String getName() {
return name;
}
public void setName(String name) {
this.name = name;
}
}
Create a separate layout for each item in recyclerview.
<?xml version="1.0" encoding="utf-8"?>

<RelativeLayout xmlns:android="http://schemas.android.com/apk/res/android"

android:layout_width="match_parent" android:layout_height="match_parent"

android:layout_marginTop="12dp" android:background="#ff952f">
<TextView
android:id="@+id/Name"
android:layout_width="wrap_content"
android:layout_height="wrap_content"
android:text="Name"
android:gravity="center_vertical"
android:textSize="14sp"
android:layout_marginTop="10dp"
android:layout_marginLeft="5dp"/>
<TextView
android:id="@+id/Fname"
android:layout_width="wrap_content"
android:layout_height="wrap_content"
android:text="Surname"
android:gravity="center_vertical"
android:textSize="14sp"
android:layout_alignTop="@+id/Name"
android:layout_centerHorizontal="true" />
<TextView
android:id="@+id/Email"
android:layout_width="wrap_content"
android:layout_height="wrap_content"
android:text="Email"
android:textSize="14sp"
android:layout_below="@+id/Name"
android:layout_alignLeft="@+id/Name"
android:layout_alignStart="@+id/Name" />
</RelativeLayout>
In listview we have to set an adapter depending on what we required to connect data and UI elements. So if we want our data to show in our activity we need an adapter. Best part is we don’t need to any outside adapter, recycler view has it’s own adapter which we have to extend to the class called RecyclerView.Adapter.
But before we dig in the code for adapter let talk a bit about viewHolder first.
For each element to show in listview getview method was called to connect each item with it’s corresponding data. So if data size was 100k the method would have to be called 100k times which would make app slow. We had to use viewholder technique to minimize the number of findViewById calls which was not the part of listview class.
Recyclerview has built in viewholder for that purpose.
So without further due let’s start the coding.
public class PersonalViewHolder extends RecyclerView.ViewHolder {

protected TextView tvName;

protected TextView tvFname;

protected TextView tvEmail;
public PersonalViewHolder(View v) {
super(v);
tvName = (TextView) v.findViewById(R.id.Name);
tvFname = (TextView) v.findViewById(R.id.Fname);
tvEmail = (TextView) v.findViewById(R.id.Email);
}
}
We have set all the things up and now we are ready to code our adapter
public class PersonalAdapter extends RecyclerView.Adapter<PersonalAdapter.PersonalViewHolder> {
private List<PersonalInfo> PersonalList;
public PersonalAdapter(List<PersonalInfo> PersonalList)
{
this.PersonalList = PersonalList;
}
@Override
public int getItemCount()
{
return PersonalList.size();
}
@Override
public void onBindViewHolder(PersonalViewHolder PersonalViewHolder, int i)
{
PersonalInfo Pi = PersonalList.get(i);
PersonalViewHolder.tvName.setText(Pi.name);
PersonalViewHolder.tvFname.setText(Pi.fname);
PersonalViewHolder.tvEmail.setText(Pi.email);
}
@Override
public PersonalViewHolder onCreateViewHolder(ViewGroup viewGroup, int i) {
View itemView = LayoutInflater.
from(viewGroup.getContext()).
inflate(R.layout. recycle_view_items, viewGroup, false);
return new PersonalViewHolder(itemView);
}
public class PersonalViewHolder extends RecyclerView.ViewHolder {
private TextView tvName;
private TextView tvFname;
private TextView tvEmail;
public PersonalViewHolder(View v) {
super(v);
tvName = (TextView) v.findViewById(R.id.Name);
tvFname = (TextView) v.findViewById(R.id.Fname);
tvEmail = (TextView) v.findViewById(R.id.Email);
}
}
}
LinearLayoutManager is the build in library that works to position the item inside the view and also when to reuse the view.
LinearLayoutManager myLayoutManager = new LinearLayoutManager(this);

myLayoutManager.setOrientation(LinearLayoutManager.VERTICAL);

recycleList.setLayoutManager(myLayoutManager);
Now populated the data in adapter and set it to our recyleview, our class will look like this;
public class RecycleViewActivity extends AppCompatActivity {

List<PersonalInfo> listOfPerson;


@Override

protected void onCreate(Bundle savedInstanceState) {

super.onCreate(savedInstanceState);

setContentView(R.layout.activity_recycle_view);

RecyclerView recycleList = (RecyclerView) findViewById(R.id.reList);

recycleList.setHasFixedSize(true);

populatedList();

LinearLayoutManager myLayoutManager = new LinearLayoutManager(this);

myLayoutManager.setOrientation(LinearLayoutManager.VERTICAL);

recycleList.setLayoutManager(myLayoutManager);
PersonalAdapter pAdapter =new PersonalAdapter(listOfPerson);
recycleList.setAdapter(pAdapter);
}
private void populatedList() {
listOfPerson = new ArrayList<PersonalInfo>();
for(int i=0;i<20;i++)
{
PersonalInfo pi = new PersonalInfo();
pi.setName("Name "+i);
pi.setFname("FName " + i);
pi.setEmail("Email_" + i + "@mobilesiri.com");
listOfPerson.add(pi);
}
}
}
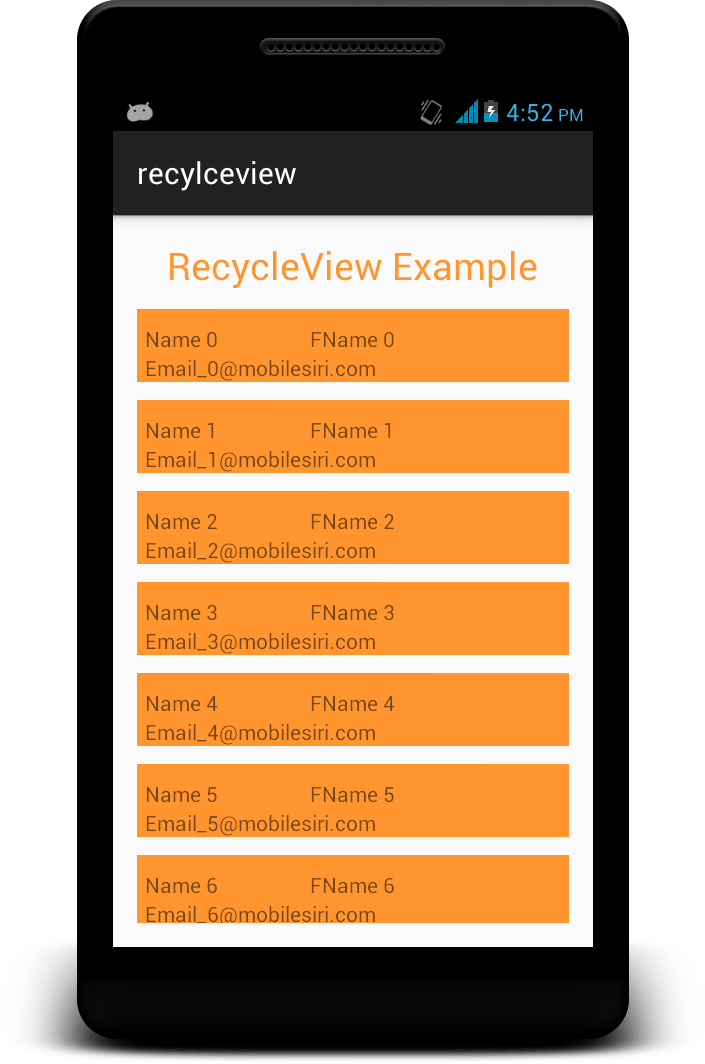
Android RecyclerView Output:
p.s: Don’t forget to import all the classes .